The Manual Coats Tire Changer is a reliable tool designed for efficient tire changing, offering durability and ease of use․ It is widely used in automotive maintenance and repair shops due to its robust construction and user-friendly design․ Coats Garage provides detailed manuals and guides for proper operation and maintenance, ensuring optimal performance and safety; This equipment is a cost-effective solution for professionals and enthusiasts alike, making it a popular choice in the industry․
Key Components of a Manual Coats Tire Changer
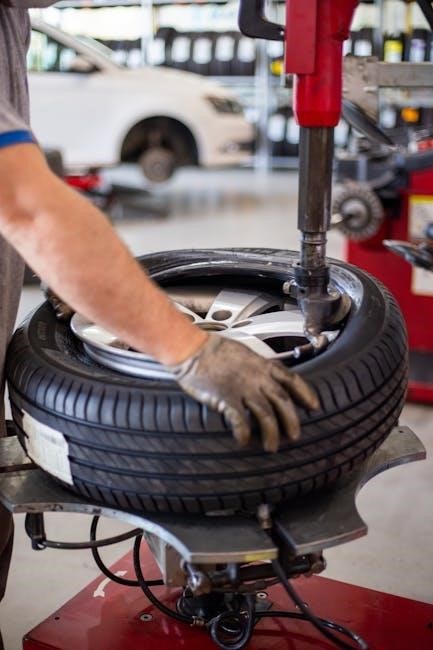
A manual Coats tire changer includes essential components like the turntable, clamping system, bead breaker, mounting arm, and control levers․ These parts work together to ensure efficient tire changing․
2․1․ Turntable and Clamping System
The turntable and clamping system are central to the manual Coats tire changer, enabling secure wheel positioning․ The turntable allows for 360-degree access, while the clamping system ensures a firm grip on the wheel rim․ This combination prevents damage and provides stability during tire removal and installation, making the process safer and more efficient for users․ Proper alignment and even pressure are crucial for optimal performance․
2․2․ Bead Breaker and Mounting Arm
The bead breaker and mounting arm are essential components of the manual Coats tire changer․ The bead breaker uses mechanical force to loosen the tire bead from the rim, while the mounting arm securely holds the tire in place during the process; Proper alignment and controlled pressure ensure safe and efficient tire removal without causing damage to the wheel or tire․
2․3․ Control Levers and Foot Pedals
The control levers and foot pedals on a manual Coats tire changer enable precise operation․ The levers control the bead breaker and mounting arm, while foot pedals provide hands-free operation, allowing the user to focus on the tire․ Together, these components streamline the tire-changing process, ensuring efficiency and ease of use for technicians and enthusiasts alike․
How Manual Coats Tire Changers Work
Manual Coats tire changers operate using a combination of levers, pedals, and mechanical force to loosen and remove tires from rims, simplifying the tire-changing process efficiently․
3․1․ The Role of the Bead Breaker
The bead breaker is a critical component that applies force to the tire bead, loosening it from the rim․ This step is essential for safely removing the tire without causing damage to the wheel or the tire itself․ Proper use of the bead breaker ensures the tire-changing process starts effectively, making subsequent steps smoother and more efficient overall․
3․2․ The Function of the Mounting Arm
The mounting arm plays a crucial role in securing the new tire during installation, ensuring proper alignment with the rim․ It holds the tire firmly in place, preventing misalignment and promoting even seating․ This step is vital for achieving a secure fit, as improper mounting can lead to safety issues or uneven tire wear over time․
3․3․ The Importance of the Clamping System
The clamping system is essential for stabilizing the wheel during the tire-changing process; It ensures the wheel remains securely held, preventing any movement that could cause damage or injury․ Proper clamping alignment is critical for safely handling heavy wheels and tires, making it a cornerstone of efficient and reliable tire changing operations․

Safety Precautions When Using a Manual Coats Tire Changer
Always read the manual before use, follow safety guidelines, and ensure a secure workspace․ Wear protective gear and maintain equipment properly to prevent accidents and ensure safe operation․
4․1․ Personal Protective Equipment (PPE)
Wear gloves, safety glasses, and steel-toe shoes when using a manual Coats tire changer․ Ensure loose clothing is secured and avoid jewelry that could get caught․ Proper PPE protects against sharp edges, flying debris, and potential equipment malfunctions, ensuring a safer working environment while operating the tire-changing equipment․
4․2․ Workspace Preparation and Safety Checks
Ensure the workspace is clear of obstacles and well-lit․ Secure the vehicle with jack stands and engage the parking brake․ Inspect the tire changer for damage or wear before use․ Proper preparation and regular safety checks minimize risks and ensure smooth operation of the manual Coats tire changer․
Assembly and Installation of the Manual Coats Tire Changer
Read the entire manual before assembling or installing․ Ensure all parts are included and follow step-by-step instructions carefully․ Proper assembly ensures safe and effective operation․
5․1․ Unpacking and Inventory of Parts
Begin by carefully unpacking the Manual Coats Tire Changer to ensure no damage occurred during shipping․ Check the inventory list to confirm all components are included․ Organize the parts according to the manual’s instructions for easy access during assembly․ Verify the condition of each item and consult the manual if any part is unclear or missing․
5․2․ Step-by-Step Assembly Process
Follow the provided manual to assemble the Manual Coats Tire Changer․ Begin by attaching the turntable to the base using the supplied bolts․ Next, install the clamping system and align it properly․ Attach the bead breaker and mounting arm, ensuring they are securely fastened․ Lubricate all moving parts as instructed․ Finally, connect the control levers and test the equipment to ensure smooth operation․
5․3․ Final Installation and Testing
After assembly, install the tire changer in a suitable workspace․ Ensure all bolts are tightened and the equipment is level․ Test the machine by changing a tire, checking the clamping system, bead breaker, and mounting arm functionality․ Refer to the manual for final adjustments and safety checks to ensure proper operation and reliability․
Operating the Manual Coats Tire Changer
Clamp the wheel securely, break the bead with the bead breaker, and use the mounting arm to remove and install tires efficiently․ Always follow the manual for proper techniques and safety guidelines to ensure smooth operation and prevent damage to the equipment or the wheel․
6․1․ Preparing the Wheel and Tire
Inspect the wheel and tire for damage or debris․ Clean the rim and bead area to ensure proper seating․ Lubricate the bead and rim contact points to prevent sticking․ Check tire pressure and refer to the manual for specific instructions on preparing different tire types․ Proper preparation ensures a safe and efficient tire-changing process․
6․2․ Loosening the Tire Beads
Loosening the tire beads is crucial for safe removal․ Use the bead breaker to gently pry the beads away from the rim․ Apply steady pressure and work around the circumference to ensure even loosening․ Avoid using excessive force to prevent rim or tire damage․ Proper loosening ensures the tire can be removed easily and safely․
6․3․ Removing the Tire from the Rim
After loosening the beads, carefully use the mounting arm or lever to pry the tire away from the rim․ Work slowly around the circumference to ensure even removal․ Avoid sudden movements that could damage the rim or tire․ Coats Garage manuals provide detailed guidance for safe and effective tire removal, minimizing potential damage․
6․4․ Installing the New Tire
Position the new tire onto the rim, ensuring proper alignment․ Use the mounting arm to gently press the tire into place․ Inflate slightly to seat the beads, then deflate and reinflate to the recommended pressure․ Check for leaks and ensure the tire is securely mounted․ Follow Coats Garage guidelines for a safe and accurate installation process․
Maintenance and Upkeep of the Manual Coats Tire Changer
Regular maintenance ensures optimal performance․ Lubricate moving parts, inspect wearable components, and clean the equipment․ Follow Coats Garage guidelines for longevity and reliability․
7․1․ Lubricating Moving Parts
Lubricating moving parts is essential for smooth operation․ Apply high-quality grease to hinges, levers, and bearings regularly․ This prevents wear and ensures longevity․ Refer to the Coats Garage manual for specific lubrication intervals and recommended products to maintain optimal performance and reliability․
7․2․ Inspecting and Replacing Wearable Components
Regularly inspect wearable parts like seals, bushings, and rollers for signs of wear․ Replace damaged or worn components promptly to maintain performance․ Use genuine Coats Garage replacement parts for reliability․ Refer to the manual for guidance on identifying and replacing these components to ensure the tire changer operates safely and efficiently․
7․3․ Cleaning the Equipment
Regular cleaning is essential to maintain the performance and longevity of the Manual Coats Tire Changer․ Use a wire brush to remove dirt and grime from the turntable and clamping system․ Wipe down all surfaces with a mild detergent and dry thoroughly to prevent rust․ Clean the bead breaker and mounting arm to ensure smooth operation and proper tire handling․
Troubleshooting Common Issues
Troubleshooting common issues with a Manual Coats Tire Changer involves identifying problems like tire sticking, bead breaker malfunctions, or clamping misalignment․ Quick solutions ensure smooth operation and safety․
8․1․ Tire Sticking to the Rim
Tires may stick to rims due to corrosion, over-tightening, or dried lubricant․ To fix, use the bead breaker to loosen the tire, apply lubricant around the rim edge, and gently pry the tire away․ Ensure the rim is clean and free of debris before reinstalling the tire to prevent future sticking․
8․2․ Bead Breaker Malfunction
A bead breaker malfunction can prevent proper tire removal․ Inspect for damage or wear, ensuring all moving parts are lubricated․ Check alignment with the tire bead and verify correct operation․ If issues persist, refer to the user manual or contact Coats Garage support for assistance․ Proper maintenance is key to avoiding such malfunctions․
8․3․ Clamping System Alignment Problems
Clamping system misalignment can cause uneven pressure and damage․ Check for proper alignment during setup and test clamp a wheel․ Adjust clamps as needed and ensure calibration․ Regular cleaning and consulting the manual can prevent issues, ensuring safe and effective tire changes․
Advantages of Using a Manual Coats Tire Changer
The Manual Coats Tire Changer offers cost-effectiveness, portability, and simplicity, making it ideal for professionals and enthusiasts․ Its reliability ensures efficient tire changes without requiring advanced technical skills․
9․1․ Cost-Effectiveness
The Manual Coats Tire Changer is a budget-friendly option for tire changing needs․ It eliminates the high costs associated with automatic models, offering a practical solution for both professionals and DIY enthusiasts․ With minimal electricity consumption and lower maintenance expenses, it provides long-term savings, making it a financially sensible choice for workshops and home garages alike․
9․2․ Portability and Space Efficiency
The Manual Coats Tire Changer is lightweight and compact, making it easy to transport and store․ Its space-efficient design allows it to fit seamlessly into small workshops or home garages, optimizing your workspace․ This portability is ideal for professionals who need to work on-site or enthusiasts with limited storage capacity, ensuring convenience without compromising performance․
9․3․ Simplicity and Reliability
The Manual Coats Tire Changer is designed for straightforward operation, requiring minimal technical expertise․ Its durable construction ensures long-term reliability, while its simple mechanical design reduces the risk of malfunctions․ With easy-to-follow manuals and minimal maintenance needs, it remains a dependable choice for professionals and DIY enthusiasts seeking a hassle-free tire-changing experience․
Comparing Manual vs․ Automatic Tire Changers
Manual tire changers like the Coats model are cost-effective and portable, ideal for small-scale use, while automatic models offer faster operation but at a higher cost and complexity․
10․1․ Speed and Efficiency
Manual Coats tire changers are efficient for small-scale use but slower than automatic models․ They require manual effort, making them less suitable for high-volume tasks․ Automatic changers prioritize speed, handling multiple tires quickly, while manual models excel in precision and control for specific or routine tire changes, balancing durability with ease of use․
10․2․ Ease of Use and Skill Requirement
Manual Coats tire changers require more physical effort and skill, as they rely on manual operation․ Automatic models are more user-friendly, with automated features that simplify the process․ Manual changers demand practice to master, especially for tight beads, while automatic ones reduce the learning curve, making them accessible for less experienced users․
10․3․ Durability and Longevity
Manual Coats tire changers are built with robust materials, ensuring long-term durability․ Their simple, mechanical design reduces the risk of mechanical failure compared to automatic models․ With proper maintenance, such as lubricating moving parts, these changers can withstand heavy use in professional settings for many years, making them a reliable long-term investment․
The Manual Coats Tire Changer is a reliable, durable, and cost-effective solution for tire maintenance․ Its simplicity and robust design make it ideal for professionals and enthusiasts․ With proper care, it offers long-term performance, making it a valuable addition to any workshop․ Coats Garage provides comprehensive support, ensuring optimal use and satisfaction for users․